


Garden Basics: Starting Seeds Indoors
Guide to gear and techniques for beginning gardeners.

New to indoor seed starting? Here are all the basics to get you going.
What You’ll Need – The Basics
· Lights – You can get by with a basic shop light fitted with fluorescent bulbs. I like the kind with space for four bulbs rather than two, because you get a wider spread of the light. You’ll need to able to raise the lights as the plants grow, which is easy with a steel wire shelf, S-hooks and chains. If the shelf is on wheels, you’ll be able to roll it in and out of the house later in the process.

· Seed starting mix – Commercial seed starting mixes work great or you can make your own mix using coconut coir or peat moss, perlite or vermiculite, and possibly some compost or fertilizer. My recipe for homemade seed starting mix is: 2 parts coco coir, 2 parts perlite, 1 part worm castings or compost. Here’s a post explaining the hows and whys.
· Cells/trays/containers – You need something to put the seeds and seed starting mix in. You can reuse plastic containers (from plant pots, yogurt cups, deli food, etc.) as long as they have holes in the bottom for drainage or you can buy trays and cells from the big box store. My preferred tool for making the holes is a soldering iron – cheap to buy and works like a champ. If you are not sure you’re going to continue seed starting, go cheap here. Having trays under your pots or seed cells is helpful for watering as the seedlings grow.
· Seeds. Of course. Not all seeds need to be started indoors. Check the package for whether to start them inside and when.
What You’ll Need – Good to Have
· Full spectrum LED lights. If you plan to make seed starting a passion, invest in these long-lasting lights.
· A timer. Your seedlings will need 16 hours of light per day. If you are forgetful or busy, get a simple timer to turn the lights on and off for you.
· A fan. While you’re at it, put a small fan on a timer, too. Moving air around prevents fungal diseases on young plants and the air flow mimics the wind plants will face when outdoors.
· A sunny window. If you have a place where you can put your gear that is near a sunny window, go for it. The natural light will supplement the artificial light you are providing. Plants may lean toward the sun, so plan on rotating your trays.
· Warming mats. Warm-weather seeds such as tomatoes and peppers like warmer soil. If your seed starting space is under 65 degrees, you may want to add a warming mat beneath the seed trays while seeds germinate. Truth: I’ve never used one, but my seed starting area is above 65.
When to Start Seeds
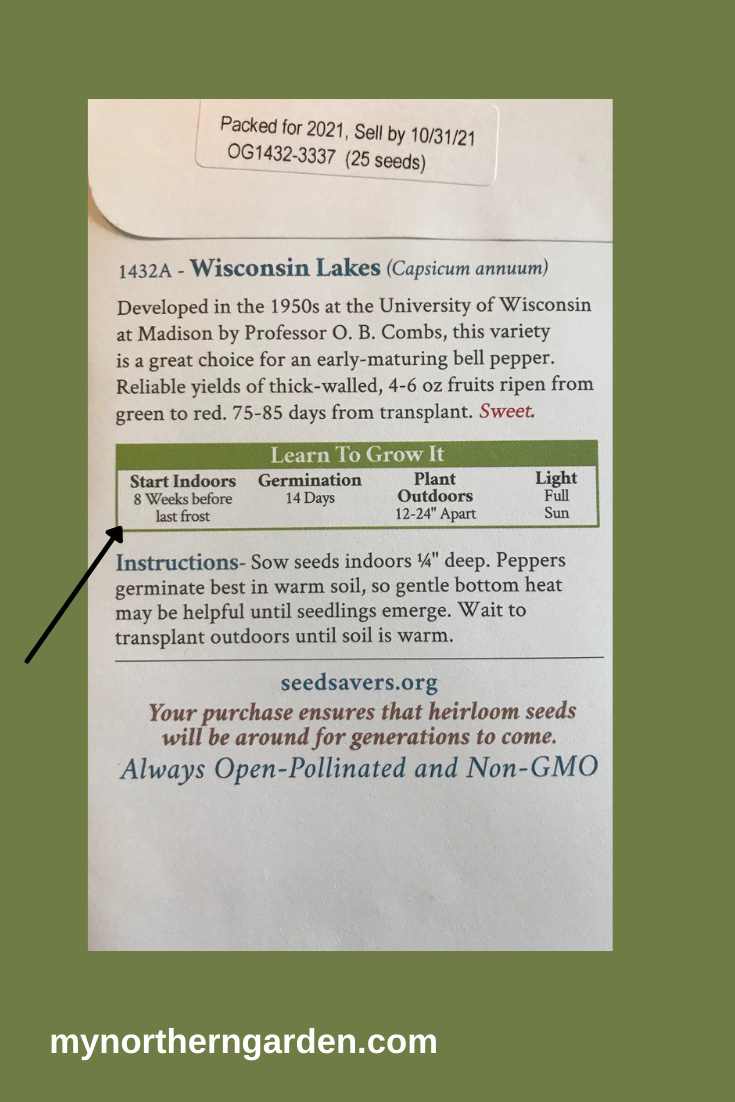
Your seed packets will tell you when to start seeds based on the last frost date in your area. Where I live, it’s listed as between May 1 and May 10. I always assume the later date because of the variability of spring weather in the North. You can start seeds based on how many weeks before May 10 they need to be started. In the image below, these pepper seeds should be started eight weeks before the last frost. If May 10 is your last frost, start the peppers about March 15. I might go even later because I know I won’t be planting out peppers, which love warm soil, until June.
Watering
You’ll want to start your seeds in damp but not soaking soil. Keep soil moisture even as they germinate by using a spray bottle or gently watering them. If at all possible, place the seed pots into a tray that can hold water. Water the tray and let the plants soak in the water from below. Don’t leave the seed cells sitting in water too long, though. More plants have been killed by over-watering than under-watering.
Damping Off
One day your little seedlings look fine. The next, they are flopped over in their seed trays. There is nothing you can do to save them and its possible an entire section of the tray will have the disease. This is damping off, a disease caused by a fungus or mold, that affects seedlings. It thrives in cool, wet conditions. To prevent it, use fresh seed starting or potting mix and clean tools and pots. It is by far the most common problem indoor seed starters face.
Legginess
Keep the lights within an inch or two of the top of your seedlings to prevent them from getting leggy. Leggy plants are weak plants and often struggle when they are moved out to the garden.
To Pot Up or Not to Pot Up
Once your seedlings have a few sets of leaves and are 3 or more inches tall, you may want to consider “potting them up.” This means moving them into a larger container so their roots have more room to grow. Potting up is useful for plants that you expect to hold awhile before putting them in the garden. For instance, I always pot up tomatoes and peppers, but never pot up lettuces that I start indoors and grow in containers on the deck. If you start your seeds in larger containers to begin with, there is no need to pot up.
Hardening Off
A week or two before you plan to plant your plants in the garden, you’ll need to harden them off. This means toughen them up to the conditions they will face outside: bright sun, winds, hard rains. Start by putting the plants outside, preferably in the shade, for just an hour. Then, slowly increase the time until they are out most of the day. Two tips for hardening off. First, if you have started a lot of plants, put them on a cart that you can wheel in and out of the house. Second, consider putting your plants in a high-sided storage tote during the first day or two of hardening off. This will protect them from the wind as they get used to outdoor conditions.
More Seed Starting Best Practices
· Cover the seed cells lightly with plastic wrap or a dome until seeds germinate. Once they start emerging from the soil, remove the cover.
· Check seedlings daily. Monitor for growth, whether they need water, signs of trouble.
· Thin your seedlings. Many seeds are tiny and you may end up with more than one in each cell or pot. As they grow, be sure to thin out some of these extra plants. If seedlings are crowded they will be weaker. Because roots may be tangled together, I use a small scissors to cut down the ones I’m thinning to avoid pulling out all the plants accidentally.
· Fertilize. Some seed starting mixes have no fertilizer in them, so you will need to add some light fertilizer to the water to feed seedlings. When you pot seedlings up, be sure to use a potting mix that has compost or fertilizer in it.
· Label, label, label. You think you will not forget which of the six varieties of tomato seeds you started are in which pots — but you will. I have. Many times. Label plants when you start, when you pot up and when you put them in the garden.
· Sterilize seed starting trays. I have reusable seed starting cell trays, and the last thing I do at the end of seed-starting season, is to wash them and sterilize them in a 10 percent bleach solution. It’s a good way to prevent damping off.
·